← Home Feeds Also on Micro.blog
  • Running BaasBox 0.9.4 on Ubuntu 14.04

    This is a simple guide to getting BaasBox up and running on Ubuntu. I’m running it on a vps on digital ocean. Right now this is purely for a dev environment and you shouldn’t expect to use the setup for a production site.

    First we get our dependencies installed:

    # Install Java, Supervisor, and unzipnsudo add-apt-repository ppa:webupd8team/java -ynsudo apt-get updatensudo apt-get install oracle-java8-installer unzip supervisor

    Next setup an account to run BaasBox

    # Add baasbox user and set up directoriesnsudo adduser baasboxnsudo -u baasboxnsudo mkdir -p /opt/baasboxnsudo mkdir -p /var/log/baasbox

    We’ll download the latest verison (0.9.4) of BaasBox and symlink it which will be helpful for later upgrades.

    # Download Baasboxncd /optnwget –content-disposition http://www.baasbox.com/download/baasbox-stable.zipnunzip baasbox-stable.zipnsudo chown -R baasbox /var/log/baasbox /opt/baasbox-*nln -s baasbox-0.9.4 baasbox

    We’re going to make a couple small changes to the default start script. This will allow us to use a config file for our server and application options, it will also allow us to run BaasBox as a daemon in the next step. Replace /opt/baasbox/start with the following script:

    https://gist.github.com/savagegus/92ab28f7c41974411dfb.js?file=start.sh

    Finally create the server config file at /opt/baasbox/baasbox.conf

    https://gist.github.com/savagegus/92ab28f7c41974411dfb.js?file=baasbox.conf

    We’ll use supervisord, which we installed in the first step to run BaasBox as a service. Supervisord will be responsible for automatically running BaasBox if the process dies or if the machine is rebooted.

    # Set up supervisornservice supervisor restart

    Create a config file in /etc/supervisor/conf.d/baasbox.conf

    https://gist.github.com/savagegus/92ab28f7c41974411dfb.js?file=supervisord-baasbox.conf

    Now you should be up and running with BaasBox on port 9000. Remember this is only acceptable for development and please replace the default appcode and admin password.
    → 12:00 AM, Jul 15
  • Swift Playgrounds and 3rd Party Dependencies

    Recently, I have been teaching myself swift and exploring 3rd party libraries. It seemed like playgrounds would be the natural way to do this, but I have spent hours trying to figure out how to make it work. My breakthrough finally came when I found this stackoverflow answer explaining the requirements. Immediately after that I found the Apple documentation for the same thing. Of course, the explanations outlined what needed to happen to use external frameworks but didn’t explain how to make it work. With an evening of project creation I was finally able to get something in a working state using cocoapods. This post assumes you have used cocoapods and have it installed in order to proceed.

    In XCode do the following:

    File -> New -> ProjectnSingle View -> NextnName: ProjectWithDependenciesnChoose a location and click create.
    n

    Now run the project. I DON’T KNOW WHY, but without this step the workspace is not correctly configured.

    File -> File -> iOS -> PlaygroundnName: PlaygroundWithDependenciesnThe default location and options are fine, click create

    You now have a project, containing a generic single view application. You also have a playground which says “hello world”.

    Now close XCode, open your terminal, and cd to the ProjectWithDependencies directory. For this post we’ll be pulling in Alamofire and Argo to our playground. To do this we will create a cocoapods project.

    pod init // create a Podfile

    Now edit the Podfile to include our dependencies.

    # Uncomment this line to define a global platform for your projectn# platform :ios, ‘6.0’

    use_frameworks!

    pod ‘Alamofire’npod ‘Argo’

    target ‘PlaygroundWithDependencies’ do

    end

    target ‘PlaygroundWithDependenciesTests’ do

    end

    Finally (make sure XCode is closed) and run:

    n
    pod installnopen ProjectWithDependencies.xcworkspace
    n

    The last command line step is to actually run pod install to generate the workspace file and pull down the dependencies we just specified.

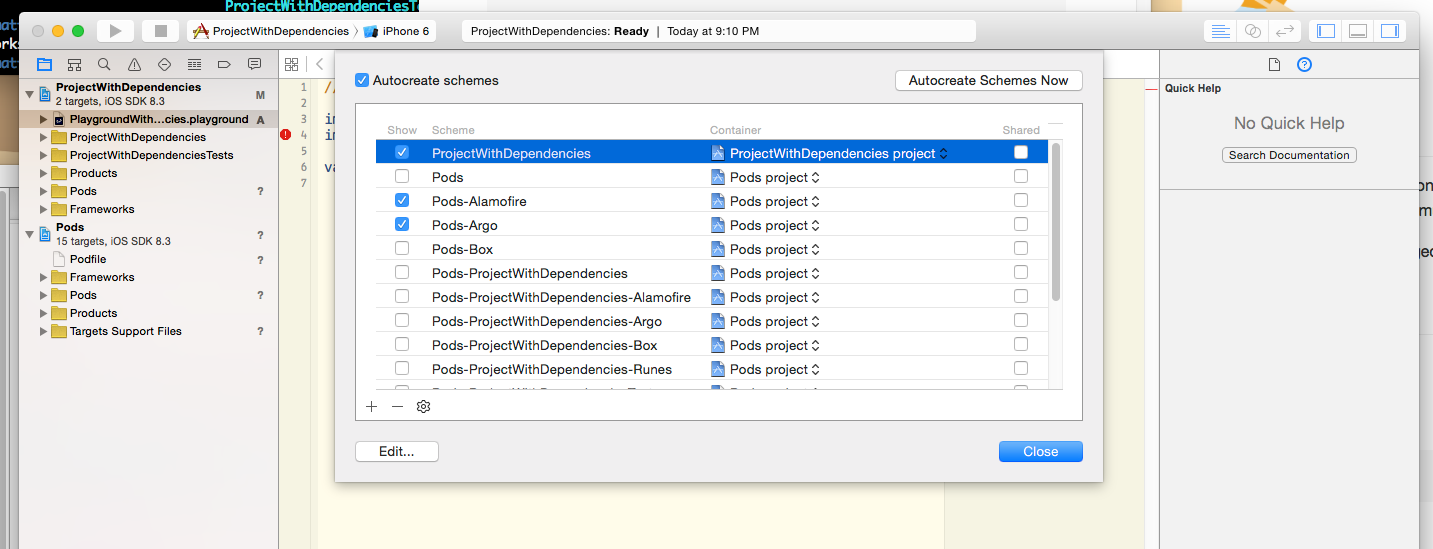
    When we open the workspace the natural thought is to open the Playground and import the new libraries, however, if you do this you’ll see that the project does not recognize them. The final prerequisite is to build the new frameworks. Click and hold on the scheme for ‘ProjectWithDependencies’ in XCode and select ‘Manage Schemes…’

    glorious xcode

    From there select the check boxes for the Pods we will want to import. For each one choose the scheme and build with the run button or with CMD+R. You must do this for each Pod you with to import. In this case Pods-Alamofire and Pods-Argon

    Finally open the playground file itself you can now import Argo and Alamofire without error.

    In case you are struggling to follow my steps the final workspace is on github.

    → 12:00 AM, Jul 7
  • BaasBox and Swift - Part 2

    In my first post I stepped through the process of porting the skeleton of the BassBox tutorial from Objective-C to Swift. This post takes that project and implements the actual tutorial in Swift. The completed project can be found on this github branch.

    The Model

    The model is a very basic class with two required fields, the title and body which are both strings. We initialize it by overridding initWithDictionary. The main Swift-ism here is using optional binding to verify the dictionary contains the key / value pairs we expect.

    https://gist.github.com/savagegus/7cfd8b5ddedde896e1ba.js?file=SMPost.swift

    When I have multiple values I need to verify through optional binding I do like using the shorthand syntax of using a single if let statement, remember through it’s only appropriate if you’re looking for a single outcome, if you want to handle multiple combinations (title is set but body is not, etc) you should look at a switch statement.

    SMLoginViewController

    The tutorial has you copy a completed LoginViewController from the finished project. It’s a rough implementation which uses segmented buttons to toggle between signup and login in code rather than through a storyboard, but it works so for now, let’s convert it to swift.

    My first step is to build a class that matches the Objective-C version, then fill in the details. To do this I first create a create a new class in Xcode by going to File -> New -> File -> iOS Source -> Cocoa Touch Class. Then I name the class, choose the appropriate subclass, and choose Swift as the language.

    Next I open the original header file, the header defines our properties and methods and gives us a quick way to build our skeleton class. Briefly this:

    https://gist.github.com/savagegus/7cfd8b5ddedde896e1ba.js?file=SMLoginViewController.h

    Becomes this:

    https://gist.github.com/savagegus/7cfd8b5ddedde896e1ba.js?file=SMLoginViewController.1.swift

    Now we need to fill in our instance menthods and implement our required methods for subclassing the UIViewController. The changes were very straight forward with the exception if implementing initWithNibName. The comparable swift method was easy to write:

    override init(nibName nibNameOrNil: String?, bundle nibBundleOrNil: NSBundle?) {n    super.init(nibName: nibNameOrNil, bundle: nibBundleOrNil);n}

    However, Xcode gave me the following error.

    SMLoginViewController.swift:16:1: ‘required’ initializer ‘init(coder:)’ must be provided by subclass of ‘UIViewController’

    The fix was easy, Xcode was able to generate it, and I was able to find the explanation of what was going on at stackoverflow

    Objective-C automatically inherits initWithCoder that’s why we don’t need to add it to destinationViewController.

    Swift requires adding init(coder aDecoder: NSCoder!) if you have init(nibName nibNameOrNil: String?, bundle nibBundleOrNil: NSBundle?) on your destinationViewController.

    Authentication

    Moving back to the tutorial, the next step is to perform the the first request to BaasBox. This is done in the viewWillAppear method of the MasterViewController. Once again the Swift implementation was just different syntax with one exception. The call to BaasBox for a collection of SMPosts is done with a completion and it took me a little time to work out the correct syntax.

    https://gist.github.com/savagegus/7cfd8b5ddedde896e1ba.js?file=getObjectsWithCompletion.m

    With the help of fuckingclosuresyntax this becomes:

    https://gist.github.com/savagegus/7cfd8b5ddedde896e1ba.js?file=getObjectsWithCompletion.swift

    Also don’t forget inside a closure you must use self where appropriate. This same pattern is repeated for authenticateUser in SMLoginViewController and createNewPost / savePost in SMMasterViewController.

    This takes us through the whole tutorial for the DearDiary getting started app.

    → 12:00 AM, Jun 26
  • BaasBox and Swift - Part 1

    BaasBox is a tool that allows you to quickly build a backend for an application. The getting started guide for using BaasBox is a little dated and written entirely in Objective-C. The tutorial is fine, but since I’m working in Swift day to day the application I was looking to build would also be in Swift.

    My first thought was to just google around and find newer tutorials. I found a single post that seemed relevant, Swifing with BaasBox - Building a quiz app with BaasBox Rather than lose all hope I decided that porting the tutorial app to Swift might be a good exercise in BaasBox and might give me an idea if I liked the tool.

    I cloned the starter project and created a swift branch started hacking away.

    Next was the brute force method of including the BaasBox SDK:

    1. Downloaded the SDK and dragged the “BaasBox-iOS-SDK” folder onto the root of the project.
    2. Created a bridging header to allow swift to import Objective-C source. Go to File -> New -> File -> iOS -> Header File. The naming is very specific, it should be ‘[ProjectName]-Bridging-Header.h’.

    In Swift files you can now import BaasBox

    gist.github.com/savagegus…

    The latest SDK and the skeleton project were on different versions so I needed to change some of the tests to get the project to compile.

    From there I stepped through and converted each class from Objective-C to Swift. They were straight forward and I was expecting more difficulty. This gets us to the beginning of the tutorial, in the next post we’ll actually implement the tutorial in Swift.

    → 12:00 AM, Jun 13
  • RSS
  • JSON Feed
  • Micro.blog