I’ve been keeping up on my DayOne habit fairly well, but there are some days where staring at that blank page just makes every thought drop out of my head. Initially, I had a lot of success with a simple change, just writing about the previous day. I found that with a little time for reflection I had a more nuanced look at what happened, what was important, and what I thought about it. Lately though I’ve avoided writing some days because I’m not sure what to lay down.
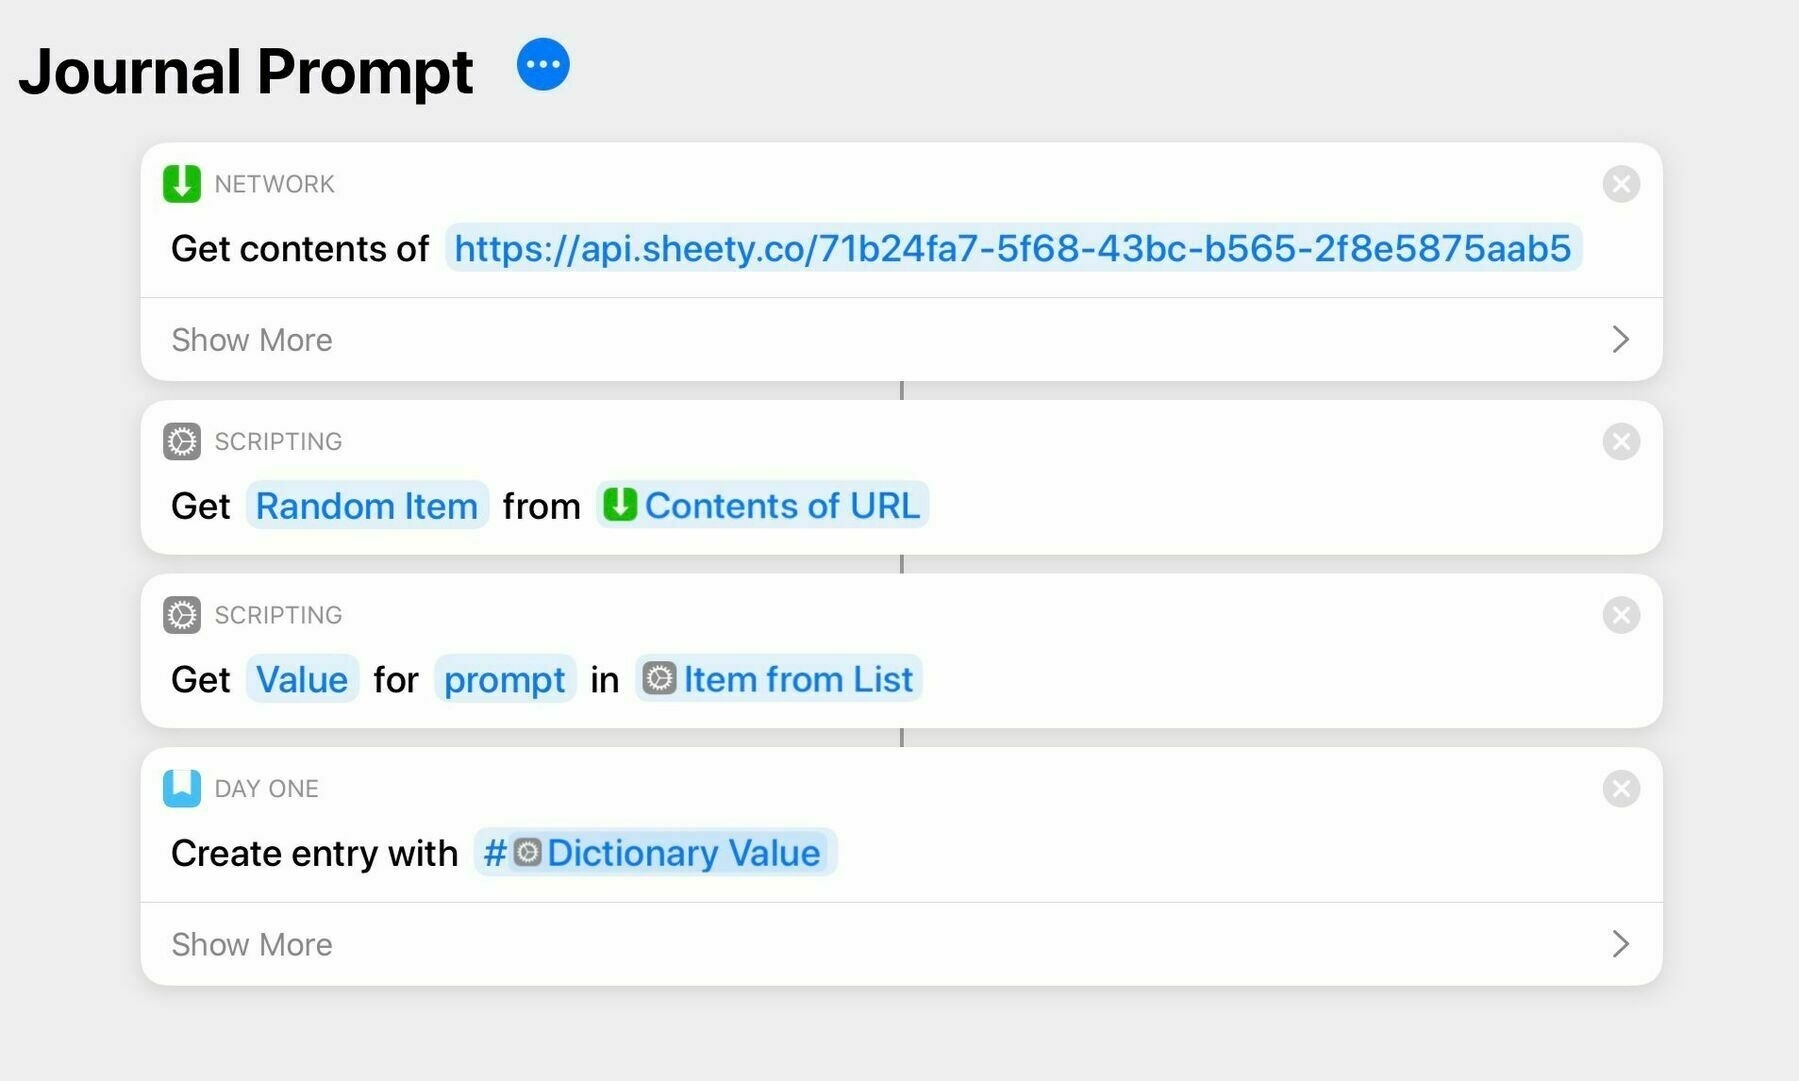
I ran across a shorcut from Brian Renshaw that templated his daily journal. I wanted that, but with more variety.
I started by searching DuckDuckGo for Journal Prompts and blindly copying the first 4 pages of results.
Next I used sheety.co to turn that list of promts into a poor mans API.
I built a shortcut, following Brian’s start and reading documentation as I overthought the process.
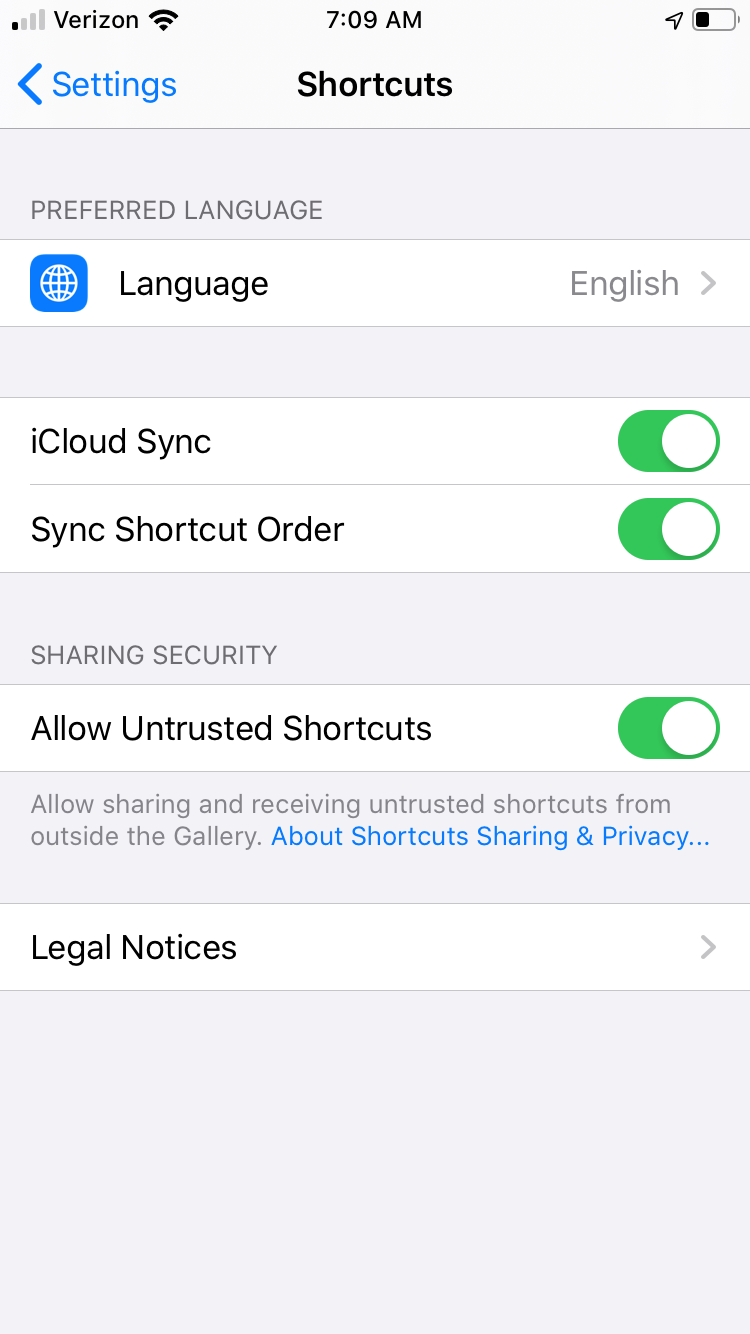
I’ve been foolhardy and have been running the iOS 13 beta on all my devices since beta 2. I haven’t hit anything past a few weird layout issues until today. While working on a blog post about a shortcut I built I went to share my work … and there was no share icon.
I looked around, long pressing everywhere and trying every button I could find. I even got desperate and looked around in the Apple Settings screens. Nothing.
After lots of duckduckgoing I found the answer. You need to download a shortcut from the gallery, then go to Settings -> Shortcuts and select “Allow Untrusted Shortcuts”. The option will not exist until you download a shortcut.
Once you allow untrusted shortcuts the share sheet will return to the Shortcut builder. 🙄
My Ink & Volt Planner has me start each week with a reflection. On a good Monday I can find the time to do it in the morning. Today I managed to get there before the end of day, which is still pretty good.
“If you want to be more productive, you need to become master of your minutes.” — Crystal Pain
Plot out your perfect morning and make it happen one day this week.
Can you master this perfect routine? Practice makes perfect.
Wake up early, before the kids, ideally 6am.
I went to bed before 10.
I have a glass of water, then coffee.
I meditate for 20 minutes.
I can read or write for 30 minutes.
I have time to make my oldest’s lunch and empty the dishwasher.
One of the kids wakes up and I have time to hang out with them a bit before the other wakes up.
I was shocked to realize how simple and attainable this was, I hadn’t realized I had been looking for a little space and quiet for myself in the mornings.
The web comic Order of the Stick has been going since 2003. It chronicles the story of a band of adventurers on a D&D campaign. It’s done in a stick figure style, but much closer to a regular webcomic than XKCD. It has a great sense of humor (although early strips are a bit dated) and genuine character development.
Although OOTS just published strip #1150 it’s still working on the same original plot line that it started with. At this point some of the early sub-plots and side quests are a bit hazy in my mind and I was thinking it would be nice to catch up. I wanted to read it through my RSS reader, starting over from the first comic, with 5 a day. It seemed like a pretty easy script to write, but I googled for a service first.
I found Comic Rocket which for the bill perfectly. It lets you replay an RSS feed in the increment you want. It also works for podcast feeds.
A few years ago I was introduced to the idea of replacing New Year’s resolutions with a theme for the year. Rather than tying your success for the new year to specific goal, you pick an area to focus on instead. It’s easier to feel accomplishment if you have several, changeable ways to reach your goals.
The first year I chose ‘Make more things’. It was fun and exciting, we made beer and sourdough. A major renovation took over the whole top floor of the house. My wife and I had a bake-off to see if I would finish the bedroom before she finished the new baby. (I won, but it was a moot point as no one was going to sleep much for a bit).
The next year the theme was ‘Finish more things’. The irony was not lost on anyone around me. It turns out, a theme without a plan leaves you adrift. After a few iterations, I’ve found that having some idea of how I want my theme to play out helps me get what I need out of it. Being gentle with myself and letting things change lets me stick with it.
For this year my theme is ‘Choose how I spend my time’. As always, it’s a little loose, but it fits with several ideas that have kept resurfacing this fall and winter. I’ll know I’m succeeding in 2019 if I am choosing to:
Short circuit self-doubt and second thoughts by paying attention to myself, spend 20 minutes a day meditating.
Look at my phone when I get to work, put my phone down when I walk in the door at night. If the kids are awake my phone doesn’t have to be. I have an Apple Watch, I’ll know if someone needs to get ahold of me.
Spend time with friends and extended family. Share lunch, play games, write letters, and make phone calls.
Write more. I started this blog as a challenge and an opportunity. I’ve also been enjoying the micro.blog community very much and will continue to contribute there.
Run run run. The last two years I’ve run the Foot Traffic Flat half-marathon. This year I’m going to try to run my first marathon.
2018 was long and tough, 2019 will be too, but I’m optimistic.
… there is no way to write these and not be self-serving. You are writing them presumably to shortcut problems that arise when people misunderstand your behavior or when they act in a way you don’t like or otherwise violate some expectations that you believe are within your rights to set.
A couple days a week I run commute to work. The day before I’ll bring extra clothes and anything else I’ll need to the office. During the run I’ll try to bring as little as possible, just a credit card, my ID, Airpods, and my LTE Series 3 Apple Watch. Having ‘watch only’ days really reminds you of the rough edges.
Strava supports recording your run without the phone but will not upload the results without the companion app. It drives me nuts.
It’s impossible to call a Lyft, Car2go, or electric scooter from just the watch. Uber still has a watch app but I won’t support their business.
Text messages may choose to go to your watch … they might go to your iPad or Mac instead. There doesn’t seem to be a clear pattern.
The Washington Post app just won’t refresh without your phone. LTE be damned.
Surprisingly, this is a short list of complaints and the Messages issue is the only one that is serious. For me, it’s almost a complete phone replacement.
This is a simple guide to getting BaasBox up and running on Ubuntu. I’m running it on a vps on digital ocean. Right now this is purely for a dev environment and you shouldn’t expect to use the setup for a production site.
We’re going to make a couple small changes to the default start script. This will allow us to use a config file for our server and application options, it will also allow us to run BaasBox as a daemon in the next step. Replace /opt/baasbox/start with the following script:
We’ll use supervisord, which we installed in the first step to run BaasBox as a service. Supervisord will be responsible for automatically running BaasBox if the process dies or if the machine is rebooted.
# Set up supervisornservice supervisor restart
Create a config file in /etc/supervisor/conf.d/baasbox.conf
Now you should be up and running with BaasBox on port 9000. Remember this is only acceptable for development and please replace the default appcode and admin password.
Recently, I have been teaching myself swift and exploring 3rd party libraries. It seemed like playgrounds would be the natural way to do this, but I have spent hours trying to figure out how to make it work. My breakthrough finally came when I found this stackoverflow answer explaining the requirements. Immediately after that I found the Apple documentation for the same thing. Of course, the explanations outlined what needed to happen to use external frameworks but didn’t explain how to make it work. With an evening of project creation I was finally able to get something in a working state using cocoapods. This post assumes you have used cocoapods and have it installed in order to proceed.
You now have a project, containing a generic single view application. You also have a playground which says “hello world”.
Now close XCode, open your terminal, and cd to the ProjectWithDependencies directory. For this post we’ll be pulling in Alamofire and Argo to our playground. To do this we will create a cocoapods project.
pod init // create a Podfile
Now edit the Podfile to include our dependencies.
# Uncomment this line to define a global platform for your projectn# platform :ios, ‘6.0’
use_frameworks!
pod ‘Alamofire’npod ‘Argo’
target ‘PlaygroundWithDependencies’ do
end
target ‘PlaygroundWithDependenciesTests’ do
end
Finally (make sure XCode is closed) and run:
n
pod installnopen ProjectWithDependencies.xcworkspace
n
The last command line step is to actually run pod install to generate the workspace file and pull down the dependencies we just specified.
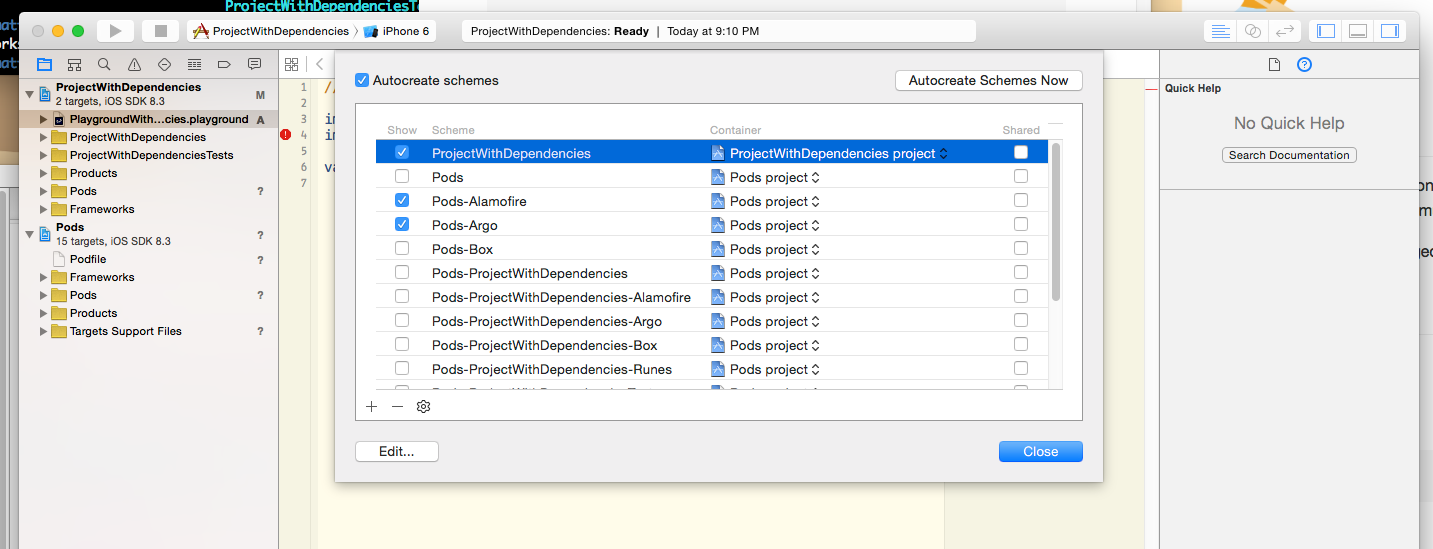
When we open the workspace the natural thought is to open the Playground and import the new libraries, however, if you do this you’ll see that the project does not recognize them. The final prerequisite is to build the new frameworks. Click and hold on the scheme for ‘ProjectWithDependencies’ in XCode and select ‘Manage Schemes…’
From there select the check boxes for the Pods we will want to import. For each one choose the scheme and build with the run button or with CMD+R. You must do this for each Pod you with to import. In this case Pods-Alamofire and Pods-Argon
Finally open the playground file itself you can now import Argo and Alamofire without error.
In my first post I stepped through the process of porting the skeleton of the BassBox tutorial from Objective-C to Swift. This post takes that project and implements the actual tutorial in Swift. The completed project can be found on this github branch.
The Model
The model is a very basic class with two required fields, the title and body which are both strings. We initialize it by overridding initWithDictionary. The main Swift-ism here is using optional binding to verify the dictionary contains the key / value pairs we expect.
When I have multiple values I need to verify through optional binding I do like using the shorthand syntax of using a single if let statement, remember through it’s only appropriate if you’re looking for a single outcome, if you want to handle multiple combinations (title is set but body is not, etc) you should look at a switch statement.
SMLoginViewController
The tutorial has you copy a completed LoginViewController from the finished project. It’s a rough implementation which uses segmented buttons to toggle between signup and login in code rather than through a storyboard, but it works so for now, let’s convert it to swift.
My first step is to build a class that matches the Objective-C version, then fill in the details. To do this I first create a create a new class in Xcode by going to File -> New -> File -> iOS Source -> Cocoa Touch Class. Then I name the class, choose the appropriate subclass, and choose Swift as the language.
Next I open the original header file, the header defines our properties and methods and gives us a quick way to build our skeleton class. Briefly this:
Now we need to fill in our instance menthods and implement our required methods for subclassing the UIViewController. The changes were very straight forward with the exception if implementing initWithNibName. The comparable swift method was easy to write:
SMLoginViewController.swift:16:1: ‘required’ initializer ‘init(coder:)’ must be provided by subclass of ‘UIViewController’
The fix was easy, Xcode was able to generate it, and I was able to find the explanation of what was going on at stackoverflow
Objective-C automatically inherits initWithCoder that’s why we don’t need to add it to destinationViewController.
Swift requires adding init(coder aDecoder: NSCoder!) if you have init(nibName nibNameOrNil: String?, bundle nibBundleOrNil: NSBundle?) on your destinationViewController.
Authentication
Moving back to the tutorial, the next step is to perform the the first request to BaasBox. This is done in the viewWillAppear method of the MasterViewController. Once again the Swift implementation was just different syntax with one exception. The call to BaasBox for a collection of SMPosts is done with a completion and it took me a little time to work out the correct syntax.
Also don’t forget inside a closure you must use self where appropriate. This same pattern is repeated for authenticateUser in SMLoginViewController and createNewPost / savePost in SMMasterViewController.
This takes us through the whole tutorial for the DearDiary getting started app.
BaasBox is a tool that allows you to quickly build a backend for an application. The getting started guide for using BaasBox is a little dated and written entirely in Objective-C. The tutorial is fine, but since I’m working in Swift day to day the application I was looking to build would also be in Swift.
My first thought was to just google around and find newer tutorials. I found a single post that seemed relevant, Swifing with BaasBox - Building a quiz app with BaasBox Rather than lose all hope I decided that porting the tutorial app to Swift might be a good exercise in BaasBox and might give me an idea if I liked the tool.
Next was the brute force method of including the BaasBox SDK:
Downloaded the SDK and dragged the “BaasBox-iOS-SDK” folder onto the root of the project.
Created a bridging header to allow swift to import Objective-C source. Go to File -> New -> File -> iOS -> Header File. The naming is very specific, it should be ‘[ProjectName]-Bridging-Header.h’.
The latest SDK and the skeleton project were on different versions so I needed to change some of the tests to get the project to compile.
From there I stepped through and converted each class from Objective-C to Swift. They were straight forward and I was expecting more difficulty. This gets us to the beginning of the tutorial, in the next post we’ll actually implement the tutorial in Swift.
For integration between ansible and consul I’ve been using a third party python client called consulate. It is decent, however both it and consul are new and it doesn’t support the full consul HTTPAPI yet.
Currently I’m trying to model our topology in consul’s key value store but lists of values are not intuitive. Consul seems to only store strings, so without doing string parsing / casting I am unable to get complicated values out.
For example, I’d like to store something like this:
and when I do a query against consul I could get back a list to work with. Since I can’t I had been doing terrible things like this:
def get_keys(self):
        output = {}
        for k, v in self.session.kv.items().iteritems():
            if not v is None and type(v) is str and v.startswith(”[”) and v.endswith(“]”):
                output[k] = v.replace(’[’, “).replace(‘]’, “).split(‘, ‘)
            else:
                output[k] = v
        return output
Reading the Consul API docs closer though I found that they have a weird implementation to support this. Specifically:
It is possible to also only list keys without their values by using the “?keys” query parameter along with a GET request. This will return a list of the keys under the given prefix. The optional “?separator=” can be used to list only up to a given separator.
For example, listing “/web/” with a “/” seperator may return:
[ “/web/bar”, “/web/foo”, “/web/subdir/” ] Using the key listing method may be suitable when you do not need the values or flags, or want to implement a key-space explorer.
So I dug into the (simple) consulate find method and added support for ?keys to it. The pull request logged with consulate and we can use my consulate fork for the time being.
I’ve been building out automation for deploying micro services in ec2. We’re using consul for service registration, discovery, health checks, and configuration. Since consul provides an available key value store for configuration we’ve been trying to define the topology that way. Ansible has some very good documentation and it is one of the things I like most about the project.
Documentation for building your own dynamic inventory is fairly complete, but I was having trouble with including variables in that inventory. The dynamic inventory documentation shows examples of of host level variables in it’s json output:
However, in the standard inventory documentation there is a differnt type of variable, specifically, group variables.
n
[atlanta]nhost1nhost2
[atlanta:vars]nntp_server=ntp.atlanta.example.comnproxy=proxy.atlanta.example.comnnSo my assumption was I could use the group variable syntax in the dynamic inventory output to achive the same thing, the power here was that different consul instances could contain different values allowing me to build a fairly dynamic infrastructure. Combining the documentation from the static inventory with the dynamic output gave me something that looked like this:
Unfortunately ansible-playbook wanted nothing to do with this. ‘databases:vars’ was being cast to a list and treated as a group which was stomping the variables I was trying to pass around. I spent a while thinking about the problem and decided that inventory wasn’t actually where I needed these variables passed in. Instead it would be fine to use consul as a facts source and use that to drive role behavior. I started out trying to augment the magic variable ‘ansible_facts’ by modifying the setup module but ultimately I didn’t want to maintain my own core module. Instead I was able to find two good blog posts about writing a fact gathering module. The first is a little old but comes from one of the best ansible blogs I’ve found. Ansible: variables, variables, and more variables explains the basic approach well but the example code seemed to no longer work. Docker: Containers for the Masses — The docker_facts module is a much more recent post and had a working example to go along with it. It turned out the reason the first example wasn’t working was due to how the module was exiting. The first example was just printing the output, now the correct approach is to use the module.exit_json method.
Little ruby script to take the results of a jql query (advanced search) in jira and create todo item’s for Cultured Code’s Things App. I use it at the beginning of a sprint to keep track of my own work and progress. If I get less lazy I could always sync back in the other direction.
Following this script to get posts from tumblr. I then get YAML errors due to bad characters in the title sections. A little grep and awk shows me the bogus titles.